
What Services Are
Services are bookable products or operational jobs that sit outside the accommodation booking itself. Hosts use them for airport transfers, private chefs, tours, equipment rental, spa treatments, childcare, photography, cleaning, and any other guest add-on that needs pricing, availability, fulfilment, or payment.
A service can have its own public checkout link, multiple rates, add-ons, availability rules, capacity, resources, workforce assignments, service bookings, and automation triggers.
Think of Services as a mini booking system inside SympleHost. It is not just a place to list add-ons. It can help you sell the service, manage who delivers it, control availability, collect payment, view bookings on a calendar, and plan workforce coverage around those bookings.
The important thing is to set up the service based on how it is delivered:
| Service Type | Best Setup |
|---|---|
| A repeatable timed service, such as a massage or airport transfer | Use Scheduled time slots |
| A request that needs team confirmation | Use On-demand requests |
| A bespoke service that needs discussion first | Use Custom arrangement |
| A fixed-date tour, retreat, course, or multi-day experience | Use Departures |
| A service that depends on a person, vehicle, room, boat, or equipment | Assign Workforce and/or Resources |
When to Use Services
- You sell guest experiences, tours, transport, or add-ons.
- You need guests to book and pay online for a service.
- You want to manage service capacity separately from room or property availability.
- You assign guides, drivers, therapists, chefs, cleaners, or other team members to service bookings.
- You run single-day or multi-day group tours with fixed dates and limited seats.
- You want service bookings to appear in calendar, workforce, bookings, team, payment, and automation workflows.
What You Can Manage in Services
The Services module can cover several workflows that often sit in different spreadsheets or WhatsApp chats:
| Area | What You Can Do |
|---|---|
| Service catalogue | Create guest-facing services with descriptions, images, rates, add-ons, policies, and public checkout links. |
| Pricing and packages | Offer flat-rate, per-person, per-unit, or group pricing with multiple package options. |
| Service calendar | View service bookings by date, service, capacity, status, and availability. |
| Workforce calendar | View service work by assigned staff member, identify conflicts, and manage shift coverage. |
| Work shifts | Create weekly or one-off shifts for staff coverage even when there is no guest booking yet. |
| Departures | Run fixed-date tours, retreats, cohorts, or multi-day services with seat capacity and rosters. |
| Resources | Control availability around limited assets such as vehicles, spa rooms, equipment, boats, or rooms. |
| Service bookings | Create, confirm, edit, cancel, assign, and track individual service bookings. |
| Payments | Collect payment through checkout links or payment links when your payment gateway is connected. |
| Automations | Trigger reminders, team notifications, preparation tasks, or follow-ups around service events. |
If a service is simple, you may only need a basic rate and schedule. If it is operationally complex, use workforce, resources, shifts, and departures so the service can be managed like a real booking product.
Service Module Workflow
A good setup usually follows this order:
| Step | Why It Matters |
|---|---|
| 1. Create the service | Adds the guest-facing product and internal record. |
| 2. Add rates and add-ons | Defines what guests can buy and how pricing is calculated. |
| 3. Choose the booking model | Controls whether guests book time slots, request availability, arrange custom details, or join departures. |
| 4. Set availability | Prevents guests from booking dates, times, or capacities you cannot deliver. |
| 5. Add resources or workforce | Connects the service to the people or assets required to deliver it. |
| 6. Publish or share the checkout link | Makes the service available for guests or direct selling. |
| 7. Manage bookings from the calendar | Gives the team a daily view of service demand, capacity, and assignments. |
| 8. Use shifts and automations | Keeps staff coverage and follow-up work from becoming manual coordination. |
This is especially useful for businesses that sell both accommodation and guest experiences, because the services sit beside your rentals instead of being managed in a separate tool.
Create a Service
Go to Services from the sidebar, then click + Add New Service.
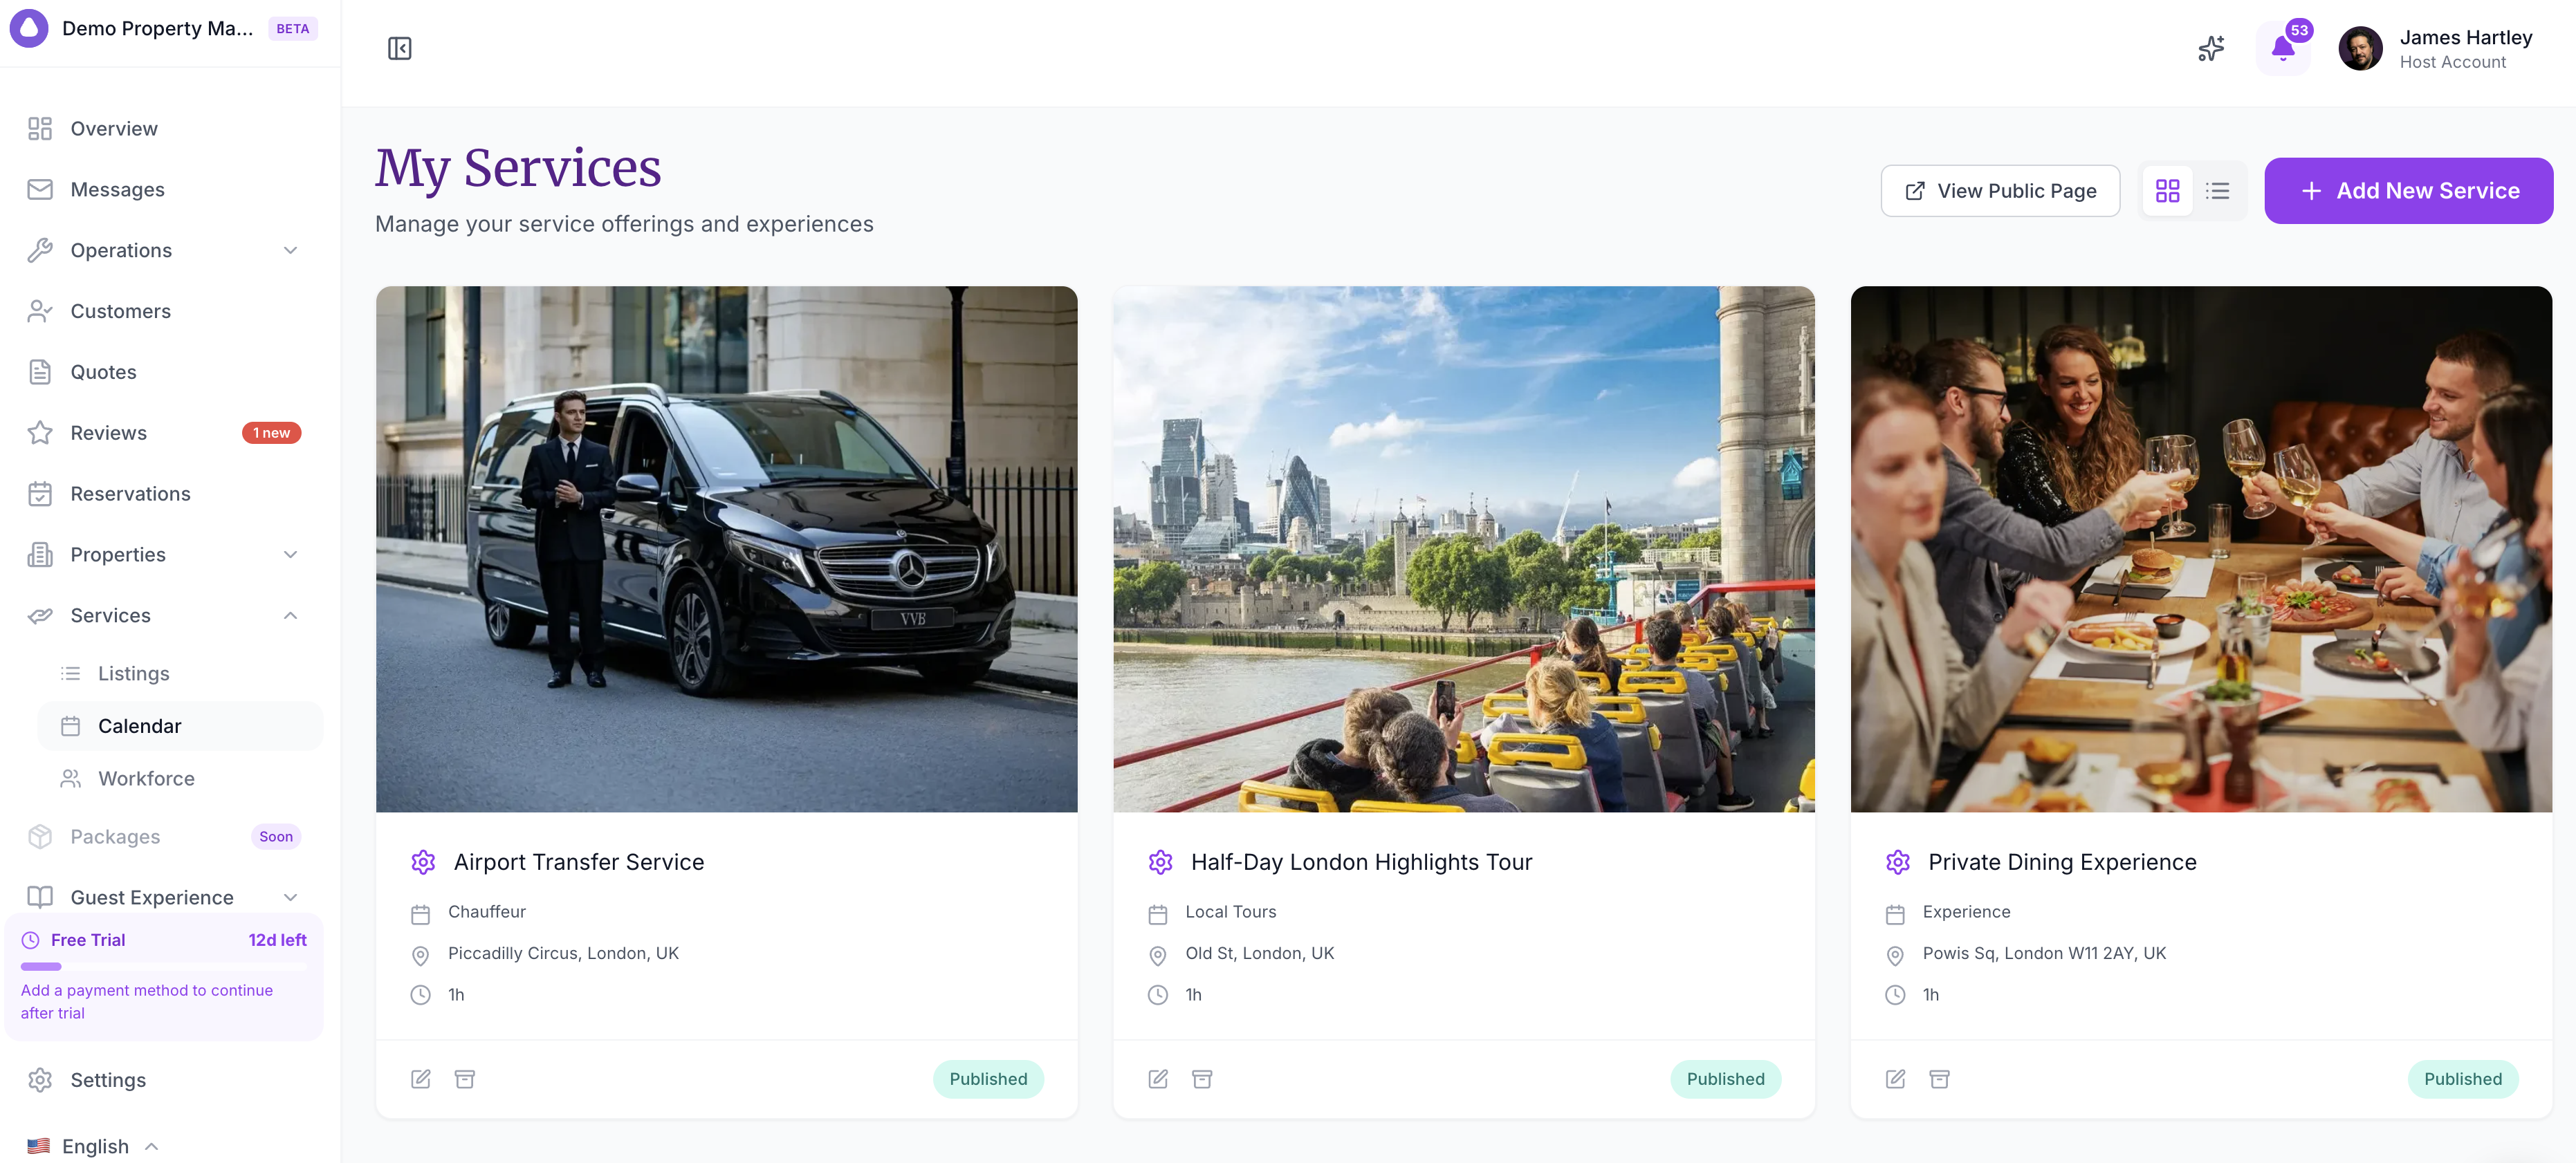
The setup flow starts with four core steps, then you can manage the service from its edit tabs:
| Step | What You Configure |
|---|---|
| Basics | Service name, category, location, description, and images |
| Pricing | Rates, pricing model, capacity, add-ons, and fees or taxes after the service is saved |
| Availability | Booking model, schedule, requirements, resources, workforce, and departures where relevant |
| Policies | Cancellation rules and guest-facing conditions |
| Workforce | Which team members can be assigned to this service |
| Departures | Fixed-date cohorts for departure-style tours or multi-day services |
Services usually start as Draft. Publish them only once the details, pricing, and availability are ready for guests.
Step 1: Basics
Add the core information guests need before they decide to book.
| Field | What to Enter |
|---|---|
| Service Name | A clear name, such as “Airport Transfer”, “Private Chef Dinner”, or “Ubud Day Tour” |
| Category | Chef, Local Tours, Groceries, Experience, Activities, Chauffeur, Photographer, Trainer, Equipment Rentals, Cleaning, Childcare, Beauty, Spa, or Other |
| Location | Where the service takes place or begins |
| Description | What is included, how the service works, duration expectations, and any important guest notes |
| Images | Guest-facing photos for the service card and booking page |
Good service descriptions answer practical questions: what guests receive, where to meet, what to bring, what is not included, and whether the service is private or shared.
Step 2: Pricing
Add one or more rates for the service. Rates are useful when one service has multiple packages, capacities, or guest types.
| Rate Field | What It Controls |
|---|---|
| Rate Name | The label guests and your team see, such as Standard, Premium, Private, or Group |
| Description | What is included in that rate |
| Duration | Optional rate-specific duration |
| Pricing Model | Flat rate, per person, per unit, or per group |
| Price | The base price in your account currency |
| Min / Max Capacity | The guest range allowed for that rate |
| Commission | Internal commission value if you track it for the service |
| Active | Whether the rate is currently available |
You can reorder rates, edit them later, or deactivate a rate without deleting the service.
Examples:
- Airport transfer: Standard car, premium car, van.
- Private chef: Two-course dinner, three-course dinner, tasting menu.
- Tour: Shared group rate, private tour rate, child rate.
- Equipment rental: Half-day, full-day, weekly rental.
Add-ons, Fees, and Taxes
Use add-ons for optional extras guests can select during booking, such as a packed lunch, child seat, airport pickup sign, or additional equipment.
After the service is saved, use the pricing charges area to attach relevant fees or taxes to that service. This keeps service pricing aligned with the wider direct booking billing setup.
Step 3: Availability and Logistics
Availability controls when the service can be booked and what information guests must provide.
Booking Models
| Booking Model | Best For |
|---|---|
| Scheduled time slots | Services that run on a recurring schedule, such as daily transfers, massages, or tours |
| On-demand requests | Services where the team responds to requests and confirms availability |
| Custom arrangement | Services that need discussion before confirming details |
| Departures | Group tours, retreats, courses, or cohorts with fixed start/end dates and seat capacity |
Scheduled Time Slots
Use scheduled slots when guests should choose from available times on the calendar.
Configure:
- Duration.
- Operating days.
- Start and end times.
- Time between bookings.
- Maximum bookings per day, guest, stay, or slot.
- Capacity through rates, service-day overrides, workforce, or resources.
This is best for services like massages, cleaners, airport transfers, or repeatable local experiences.
On-demand Requests
Use on-demand when guests can request the service, but the team may still need to respond or confirm.
Configure:
- Duration.
- Response time.
- Concurrent request limit.
- Guest notification mode.
- Operating hours.
This is useful when availability changes frequently or the host needs to check a provider before committing.
Custom Arrangement
Use custom arrangement when the service cannot be fully booked from a standard time slot. Examples include wedding support, special events, custom itineraries, private celebrations, or VIP services.
Add clear instructions so the guest knows what happens next, who will contact them, and what information they should provide.
Departures for Tours and Multi-Day Services
Use Departures for fixed-date tours, retreats, courses, cohorts, or multi-day experiences.
Each departure can have:
- Start date and end date.
- Capacity.
- Minimum guests needed to run.
- Optional tracks or groups.
- Internal notes.
Examples:
- A one-day group tour leaving every Saturday.
- A three-day retreat with 12 seats.
- A ski course with beginner and advanced tracks.
- A cooking class cohort with fixed dates.
Departure services do not use normal recurring operating hours in the same way as scheduled slots. The departure date range and seat capacity control when guests can book.
After the service is saved, use the Departures area to add, edit, duplicate, cancel, and review departures. The roster shows who is booked into a specific departure, their party size, track, deposit, and payment status.
Guest Requirements
Use requirements to reduce back-and-forth before the booking:
- What’s Included and What’s Not Included
- What to Bring
- Important Information
- Required forms or online form links
- Custom instructions for the guest
Resources and Workforce
If a service depends on a person, room, vehicle, boat, equipment, or other limited resource, assign it in the service setup.
- Resources help control availability when the same physical asset can only be used once at a time.
- Workforce connects eligible team members to the service. Their working schedule and date-specific blocks can affect assignment availability.
If no resource or workforce member is assigned, the service uses the service schedule only.
Manage Resources
Use Services → Resources for people, rooms, vehicles, equipment, or other assets that limit service availability.
Resource types include:
| Resource Type | Example |
|---|---|
| Person | A contracted guide or specialist provider |
| Room | Spa room, meeting room, kitchen, studio |
| Equipment | Kayaks, bikes, cameras, baby cots |
| Vehicle | Van, car, boat, scooter |
| Other | Any limited item that does not fit the standard types |
For each resource, set:
- Name and description.
- Resource type.
- Active or inactive status.
- Timezone.
- Weekly schedule.
- Calendar blocks for full days or time ranges.
Assign resources to services when bookings should only be available if at least one assigned resource is free.
Services Calendar
Use the Services calendar when you want to work by date instead of by service card.
The calendar helps you answer questions like:
- What services are booked today?
- Which service days still have capacity?
- Which bookings are pending payment or confirmation?
- Which bookings do not have a staff member assigned yet?
- Are there any conflicts between service bookings, workforce schedules, and blocked times?
- Do we need to block a day, reduce capacity, or add more staff coverage?
The Services calendar is separate from the property calendar. Property calendar dates control accommodation availability. Services calendar dates control experiences, transfers, add-ons, tours, and other service bookings.
By Service View
Use the By service view when you want to see demand and availability for each service.
This is useful for:
- checking how many bookings a service has on a date
- seeing remaining capacity for scheduled services or departures
- opening a service booking from the calendar
- creating a new service booking manually
- blocking a date for a service
- reviewing payment and confirmation status
- managing a service day when capacity or availability needs to change
By Workforce View
Use the By workforce view when the main question is staff coverage.
This is useful for:
- seeing each staff member’s assigned service bookings
- spotting unassigned service bookings
- checking whether a person is already booked
- finding overlap conflicts before assigning work
- rescheduling or reassigning a service booking
- reviewing off-shift hours, blocked times, and time off
- planning who is covering a tour desk, service point, or operations location
If your service depends on people, the workforce calendar is often the fastest place to make sure the booking is deliverable.
Manage Service Workforce
Use Services → Workforce to invite and manage the people who deliver services.
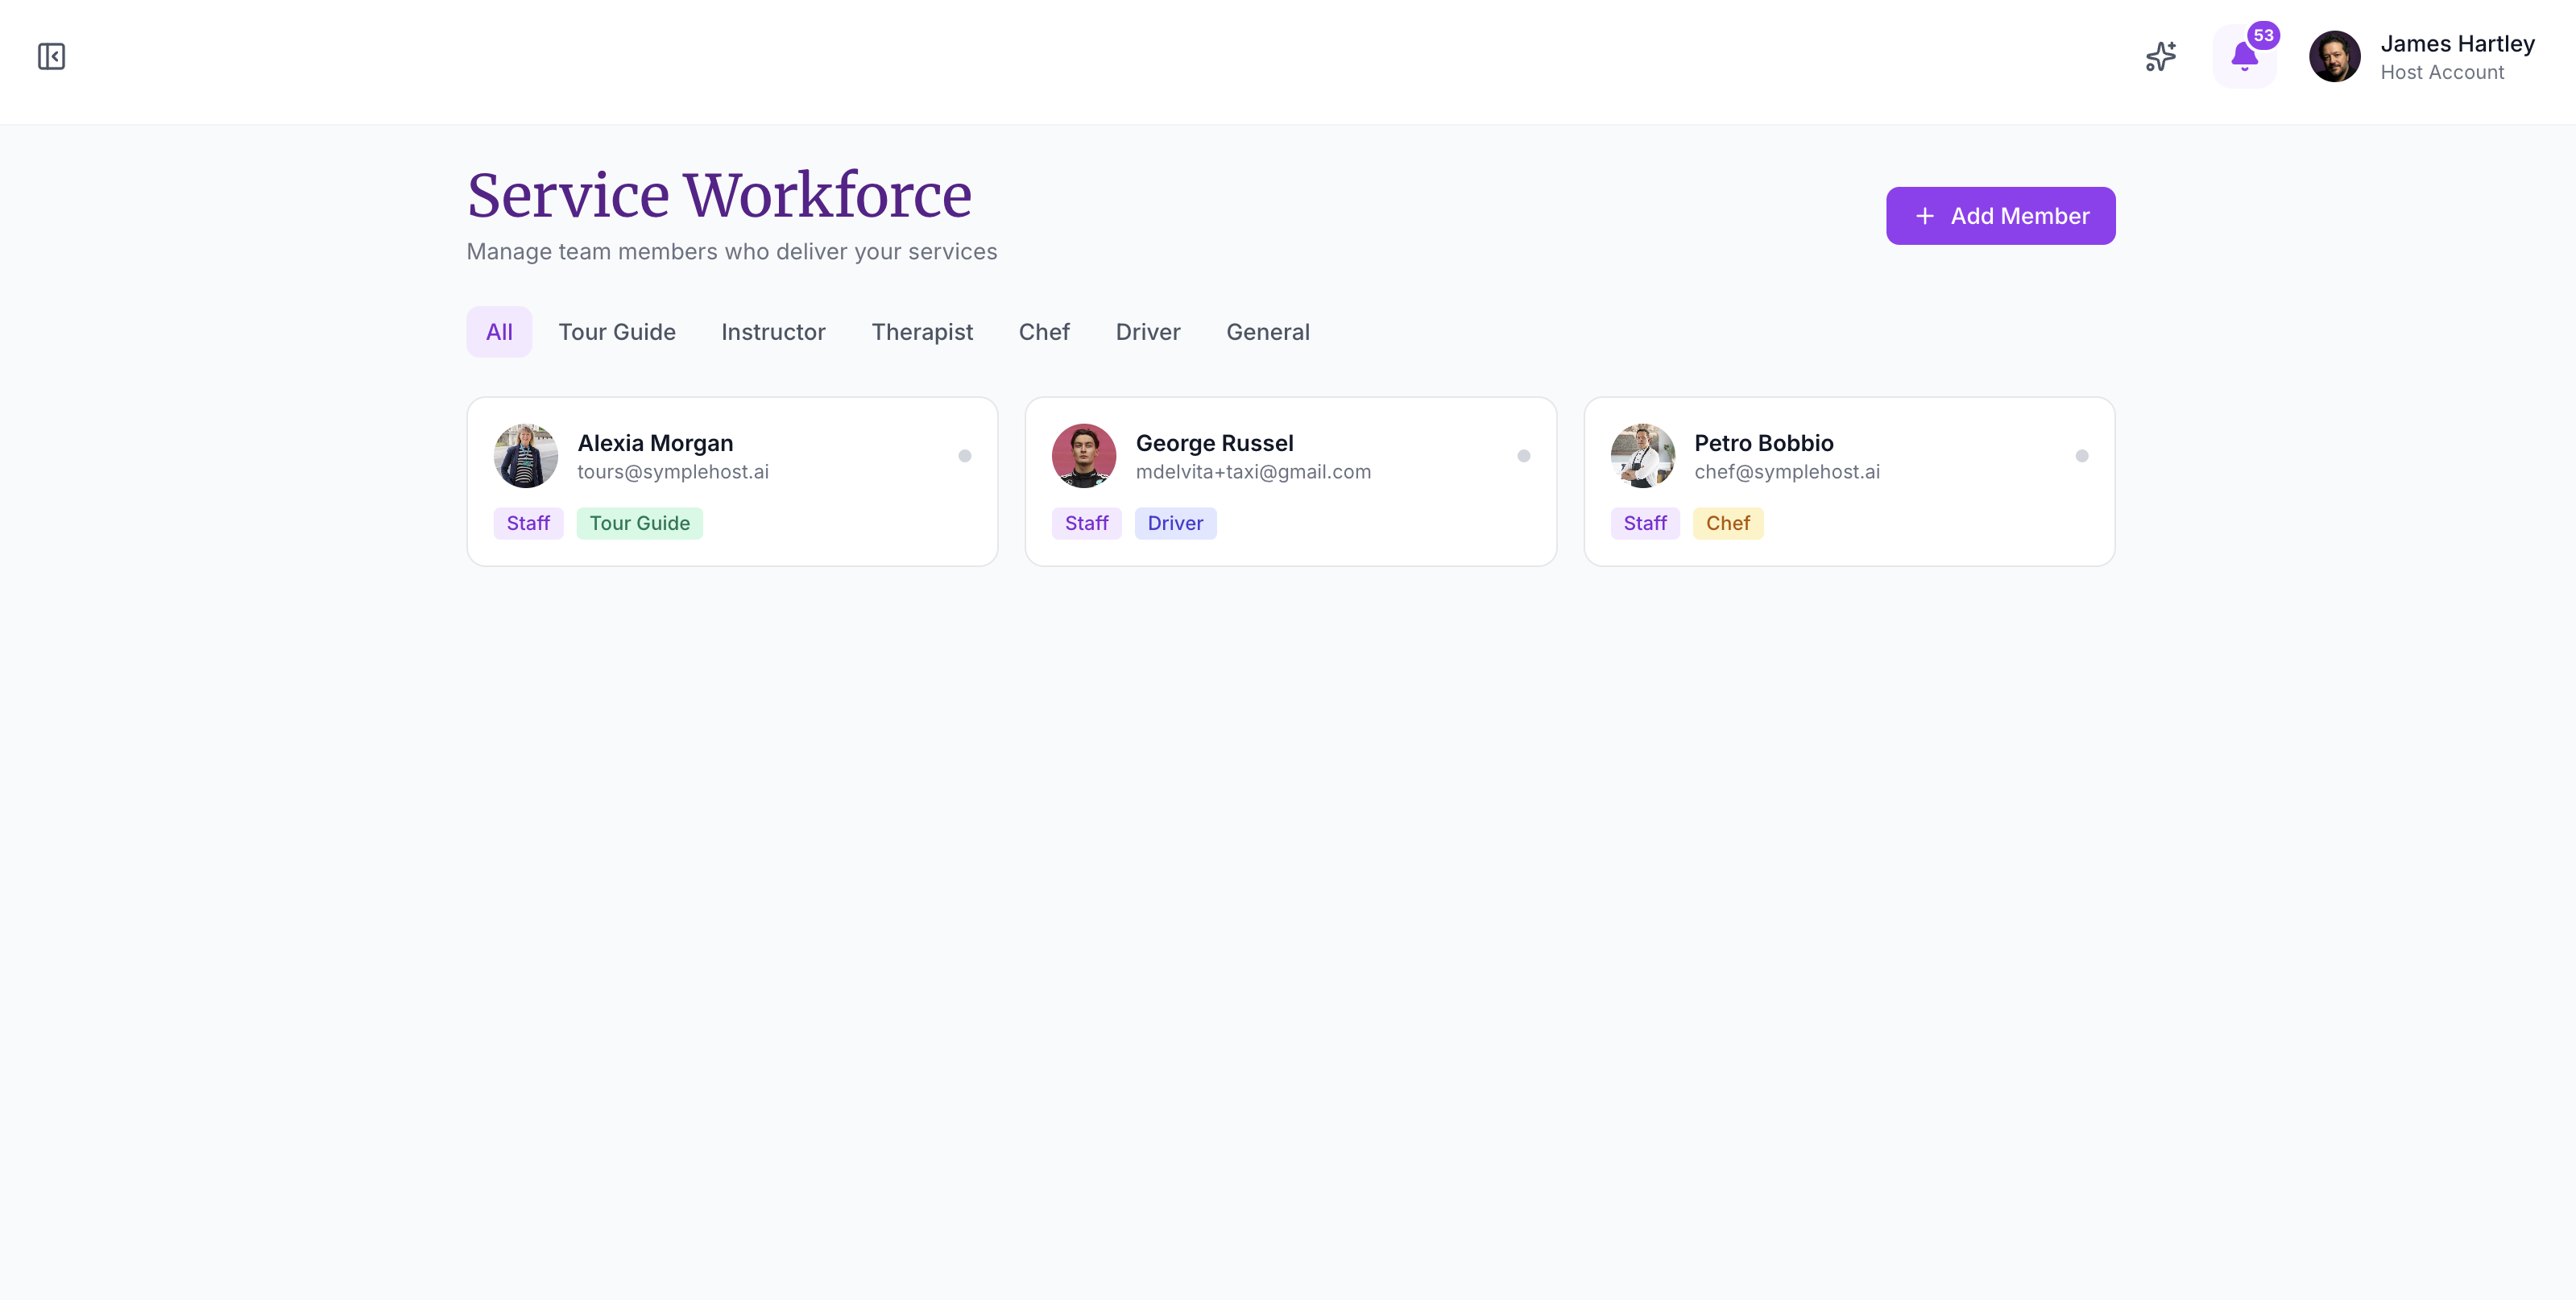
Click + Add Member, then add the person’s name, phone, email if available, and primary role.
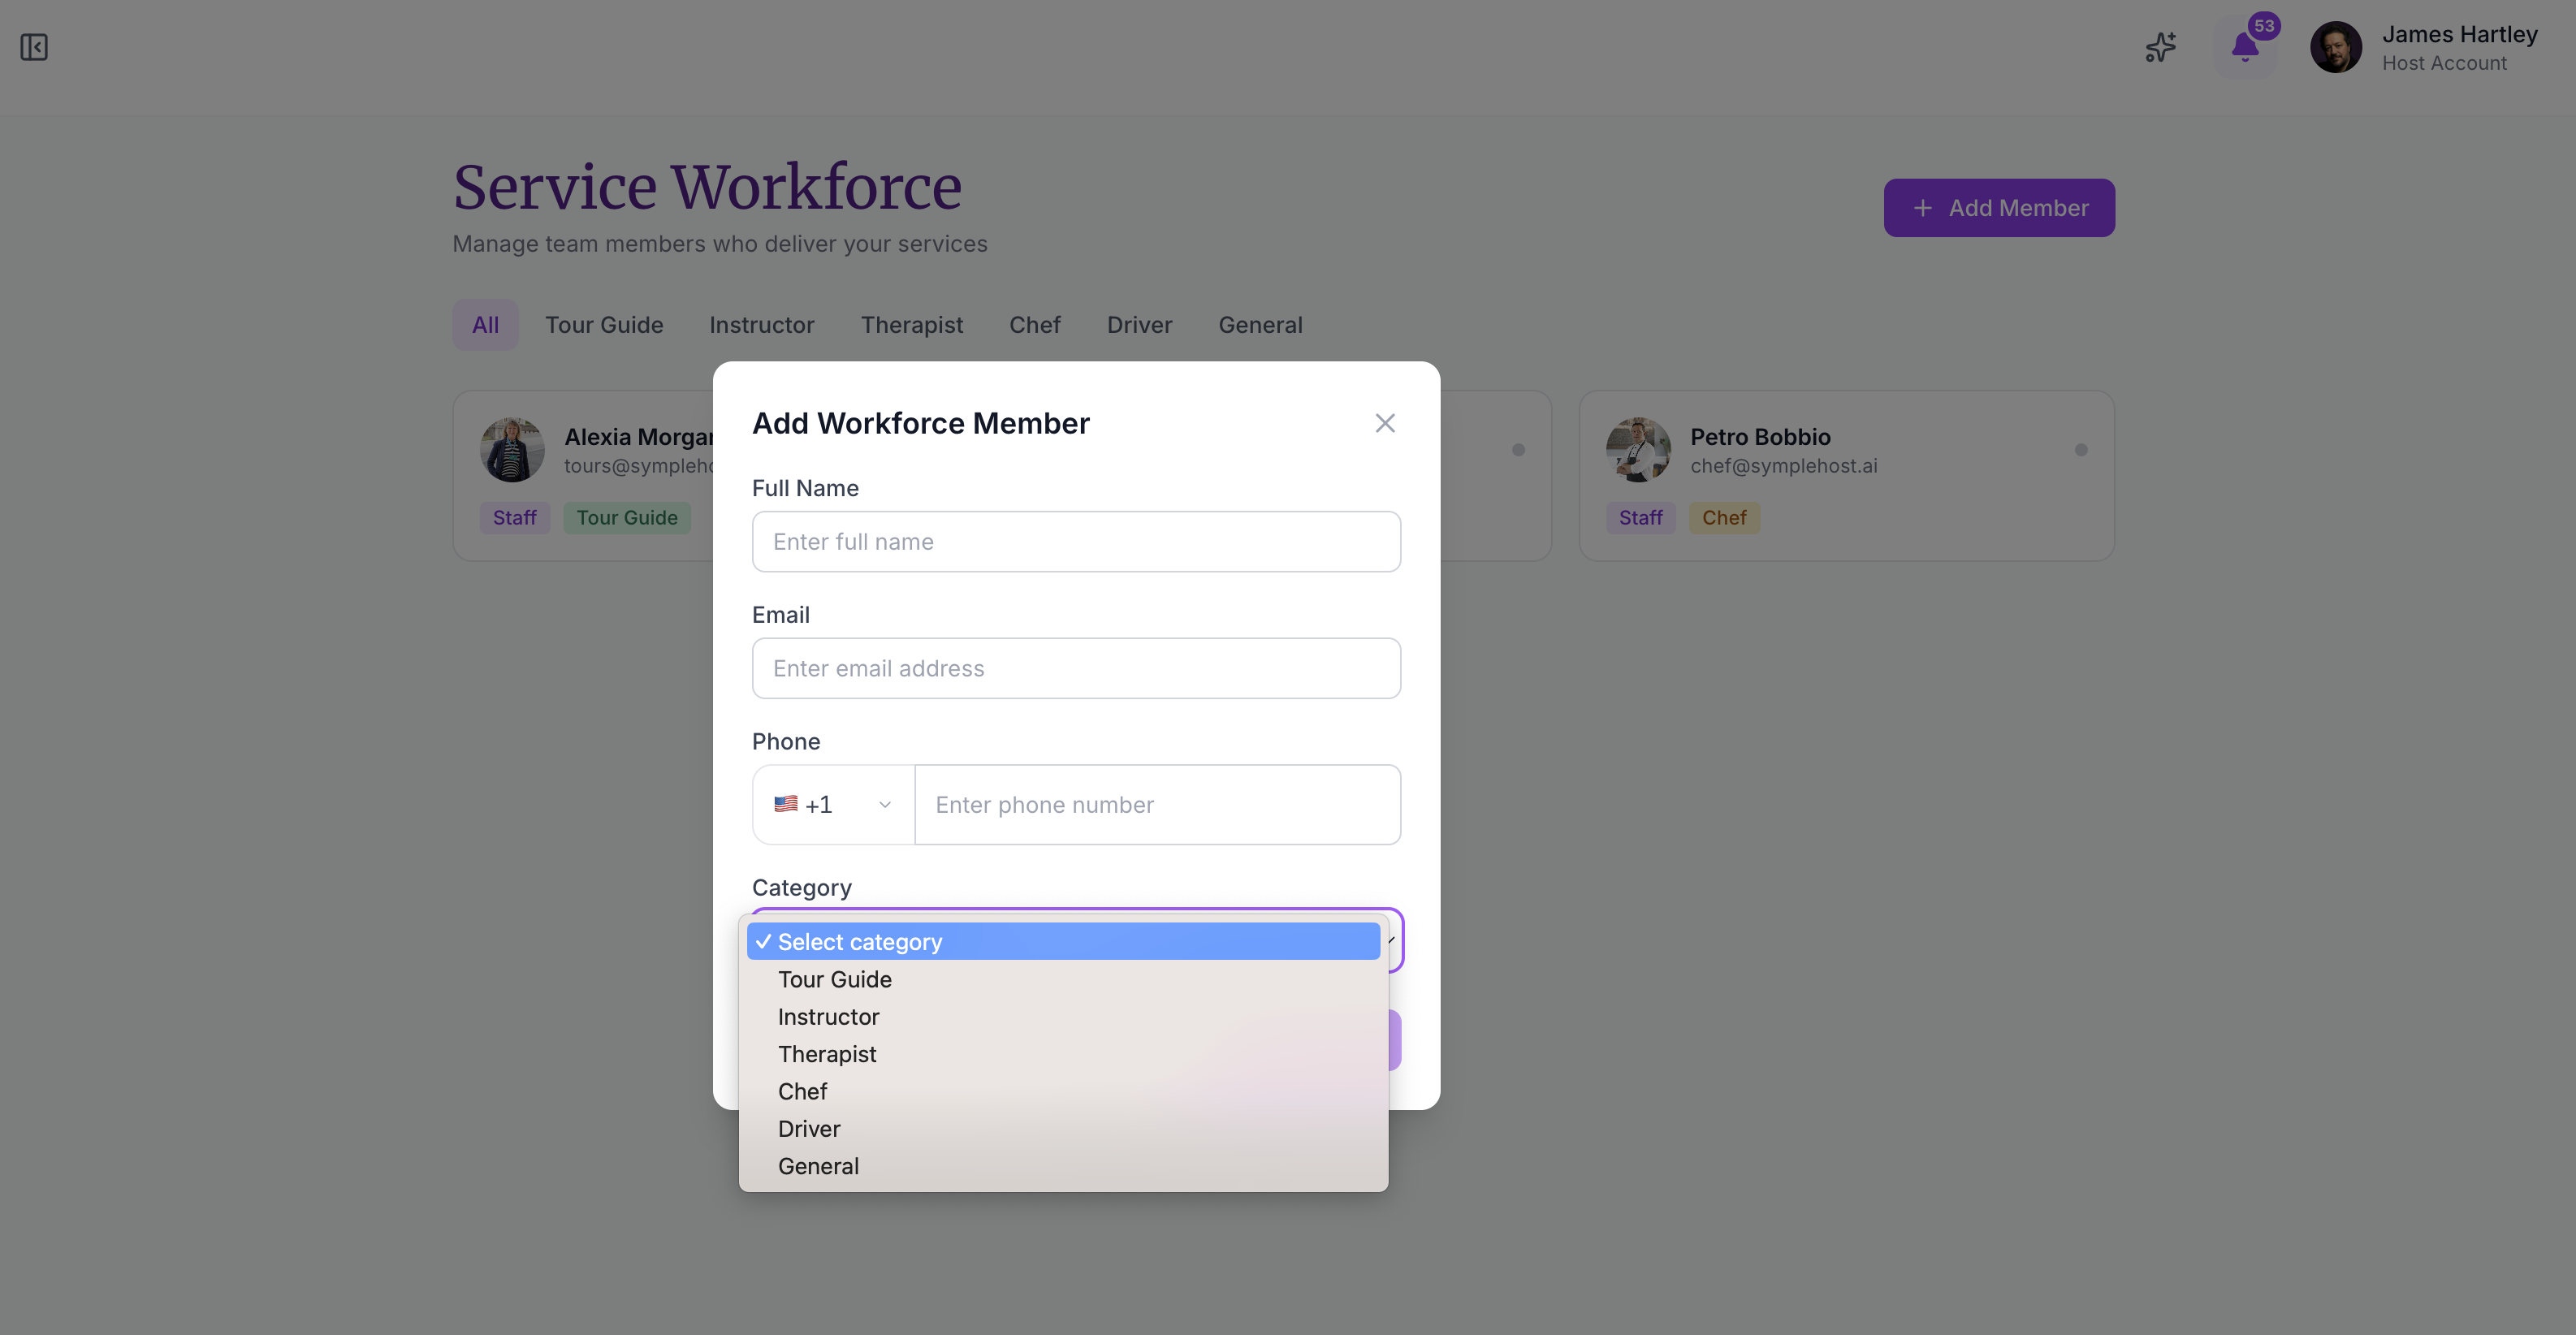
Workforce roles can include:
- Tour guide.
- Instructor.
- Therapist.
- Chef.
- Driver.
- General service.
- Custom roles, such as house manager or concierge.
You can also add additional capabilities if one person can perform multiple roles.
Workforce Profiles
Each workforce member can have:
- Active or deactivated status.
- Contact details.
- Working schedule by weekday.
- Assigned services.
- Performance score.
- Stats, notes, portal details, and task history.
The working schedule matters because service booking assignment checks whether the person is available, off schedule, blocked, or already booked.
Assign Workforce to Services
After creating workforce members, assign eligible people to each service from the service’s workforce area.
Only workforce assigned to that service appears as an eligible assignee when creating or editing a service booking.
Manage Shifts and Workforce Calendar
The services calendar includes a By workforce mode. This shows staff rows against time, so you can see service bookings and workforce availability from an operations view.
Use this view to:
- Filter by service or staff member.
- See unassigned service bookings.
- See each staff member’s jobs and hours.
- Identify overlap conflicts.
- Open a booking and assign, reassign, unassign, or reschedule staff.
- Open the service booking detail page.
- Review off-shift hours and time off.
If you have permission to manage team schedules, use Manage shifts to create shift schedules.
Shift schedules can be:
| Shift Type | Use It For |
|---|---|
| Weekly | Recurring location coverage, such as every Monday and Wednesday from 9am to 5pm |
| One-off | A single shift on a specific date |
Shifts allocate a workforce member to a location without creating a guest service booking. They are useful for planning coverage at a rental shop, reception point, tour desk, operations base, or event location.
You can edit active shift schedules or cancel future shifts while keeping cancelled schedules for reference.
Use shifts when you need coverage, not a guest booking. Use service bookings when a guest has requested or purchased a specific service.
Examples:
| Scenario | Use |
|---|---|
| A driver is rostered at the airport desk every Friday | Weekly shift |
| A tour guide is covering a special event for one day | One-off shift |
| A guest books a paid airport transfer | Service booking |
| A chef is assigned to a private dinner booking | Service booking assignment |
| A staff member is unavailable for a day | Workforce block or time off |
Step 4: Policies
Add cancellation rules so guests and your team understand what happens if a booking is cancelled.
Each rule can include:
| Field | Example |
|---|---|
| Timeframe | More than 7 days before, 2-7 days before, within 24 hours |
| Refund Percentage | 100%, 50%, or 0% |
| Conditions | Weather exclusions, missed booking rules, or partner-specific notes |
Use the policy section for clear, guest-facing expectations. Keep internal notes in the relevant service, departure, or booking record instead.
Publish and Share the Service
From Services, open the service card actions to edit, publish, archive, delete, or copy the guest checkout page link.
Published services can appear on the public service booking page. The checkout page link is only useful when payments are connected, because direct guest bookings need a working payment flow.
| Status | What It Means |
|---|---|
| Draft | Saved internally but not live for guests |
| Published | Live and bookable |
| Archived | Removed from active selling while keeping history |
Archive a service when you want to pause it but keep past bookings. Delete is only available where there is no booking history.
Manage Service Bookings from the Calendar
Go to Calendars → Services to view service availability and service bookings. This calendar is separate from the property calendar, so service availability does not get mixed up with room nights.
The services calendar has two useful modes:
| Mode | What It Shows |
|---|---|
| By service | Service rows across dates, with capacity, booking chips, blocks, and daily actions |
| By workforce | Workforce rows across dates and hours, with assigned/unassigned bookings and shifts |
From the services calendar you can:
- Filter the calendar by service.
- Navigate by day, month, or custom date range.
- See confirmed, pending, cancelled, paid, partially paid, pending payment, disputed, failed, and refunded service bookings where relevant.
- Open a day to view bookings, remaining slots, or departure seats.
- Create a New service booking directly from a service date.
- Manage a specific service day, including capacity overrides.
- Block a day as closed, maintenance, or private.
- Review assigned workforce for that date and block or unblock team members where needed.
When you create a service booking manually, select the guest, date/time, rate, guest count, optional add-ons, discount, notes, and assignee. SympleHost creates the booking and payment link, then reserves the slot immediately.
For departure services, the booking is tied to a specific departure date and, if enabled, a specific track or group.
Service Booking Lifecycle
Most service bookings move through a simple lifecycle:
| Stage | What Happens |
|---|---|
| Requested or created | The booking is created by a guest, by the team, or from the calendar. |
| Pending confirmation | The team may need to confirm availability, assignment, or payment. |
| Confirmed | The service is expected to happen and should be visible to the relevant team. |
| Assigned | A workforce member or provider is responsible for delivery. |
| Paid or partially paid | Payment status updates based on the payment link or recorded payment. |
| Completed | The service has been delivered and any follow-up work can be triggered. |
| Cancelled or declined | The booking no longer needs to be delivered, but the record remains for history. |
For services that need team approval, do not treat a booking as operationally ready until confirmation, payment, and assignment are clear.
Blocking Service Dates
Use Block day when a service should not be bookable on a specific date or range.
Block reasons include:
- Closed: service unavailable.
- Maintenance: equipment, vehicle, venue, or resource needs work.
- Private event: service capacity is reserved for an owner or private group.
Blocking a day hides the service from guest booking for that day and helps the team understand why it is unavailable.
Service Booking Detail Pages
Service bookings also have their own booking records under Bookings → Services. Use these pages when you need more detail than the calendar view.
Typical service booking actions include:
- Review customer details, selected rate, date/time, guests, add-ons, notes, and payment status.
- Confirm, cancel, decline, or edit the booking where available.
- Send or manage payment links.
- Assign or change the workforce member.
- Add internal notes and review activity history.
- Open any guest/service communication connected to the booking.
Service booking status matters. A pending booking may still need confirmation or payment handling before the workflow is complete.
If a booking has already taken payment or needs payment collection, use the payment link and payment status shown on the booking record rather than managing it outside SympleHost.
Common Service Setups
Use these patterns as a starting point:
| Service | Recommended Setup |
|---|---|
| Airport transfer | Scheduled or on-demand service, rates for car/van/premium vehicle, driver workforce, vehicle resource, payment link. |
| Private chef dinner | On-demand or custom arrangement, package rates, add-ons for drinks or extra courses, chef workforce, guest requirements. |
| Spa or massage | Scheduled time slots, therapist workforce, room resource, buffer time between bookings. |
| Local day tour | Scheduled time slots or departures, per-person pricing, guide workforce, vehicle/resource capacity. |
| Multi-day retreat | Departures, start/end dates, seat capacity, deposits, roster, guest requirements. |
| Equipment rental | Per-unit pricing, equipment resource, pickup/return instructions, block dates for maintenance. |
| Extra cleaning | On-demand request or scheduled slot, cleaning workforce, checklist task or operations follow-up. |
| Custom event | Custom arrangement, quote first if needed, internal notes, manual confirmation, payment link. |
If the guest should pay immediately, use a published checkout flow. If the team needs to confirm details first, use on-demand, custom arrangement, or a quote workflow before taking final payment.
Automations for Services
Service bookings can be used in automated workflows. Depending on your setup, automations can trigger when a service booking is created, confirmed, completed, cancelled, reassigned, rescheduled, or coming up soon.
Common examples:
- Send a guest reminder before a service starts.
- Notify the assigned workforce member when a booking is confirmed.
- Send preparation instructions or required form links.
- Create a follow-up task after a service ends.
- Alert the team when a service booking is cancelled or reassigned.
Keep service automations separate from accommodation automations so the wording, timing, and responsibilities stay clear.
Operational Tips
- Keep service names guest-friendly. Internal shorthand makes calendars harder for the team to read.
- Use separate rates instead of creating duplicate services when the product is the same but the package or price changes.
- Use add-ons for optional extras, not for core parts of the service.
- Add resources when availability depends on a limited physical asset.
- Add workforce when a person needs to deliver or be assigned to the booking.
- Use shifts for coverage planning and service bookings for actual guest purchases or requests.
- Review the services calendar daily if services are a meaningful revenue stream.
- Keep departure capacity updated before marketing fixed-date tours or retreats.
- Connect payments before sharing checkout links publicly.
Troubleshooting
I can’t publish my service
Check that the required basics are filled in, at least one active rate exists, pricing is valid, and availability is configured. Services with incomplete setup should stay in Draft until they are ready.
Guests cannot see or book the service
Confirm the service is Published, has an active rate, has bookable availability, and is not archived. For scheduled services, check operating days and capacity. For departure services, check that at least one upcoming departure is open and has seats left.
A workforce member cannot be assigned
The person must be part of the service workforce and assigned to that service. Also check their working schedule and whether they are blocked on the selected service date.
If they appear unavailable in the workforce calendar, check for existing bookings, time off, shift conflicts, or an off-schedule time.
A service is full when I expected space
Review the service rate capacity, the service calendar day capacity, and any departure capacity. For departure services, capacity is seat-based across the departure rather than a repeating daily time slot.
If resources or workforce are assigned, availability may also be limited by the resource schedule, resource calendar blocks, workforce schedule, or workforce blocks.
I want to pause a service
Archive the service if you want it removed from public booking while preserving history. Use the services calendar to block specific days when the service is only unavailable for certain dates.
The currency looks wrong
Service pricing uses your account currency. Open the top-right profile menu, then go to Settings → General to verify the account country and currency.
Key Takeaways
- Services are bookable add-ons, experiences, transfers, and operational services.
- Use rates for different packages, prices, durations, and capacity rules.
- Use scheduled slots for repeatable services and departures for fixed-date or multi-day tours.
- Assign workforce when a person delivers the service.
- Assign resources when a room, vehicle, equipment, or other asset limits availability.
- Use Calendars → Services in both by-service and by-workforce modes.
- Use shift schedules to plan staff coverage without creating guest bookings.
- Use service automations for reminders, team notifications, reassignment updates, and follow-up workflows.